
This short post will walk you through a mental exercise in simple interrupted suture placement. It aims to help junior learners develop good habits (and to help seasoned vets to break bad ones!).
The technique as described focuses on how to achieve great eversion–a commonly accepted tenet of great wound edge approximation–although a forthcoming post will discuss the dearth of evidence that actually supports this practice.
Or, if you prefer your learning by video, check out this 1:15 short narrated by my friend Dr. Jonathan Kantor, a practicing dermatologist and author of the excellent text the Atlas of Suturing Techniques.
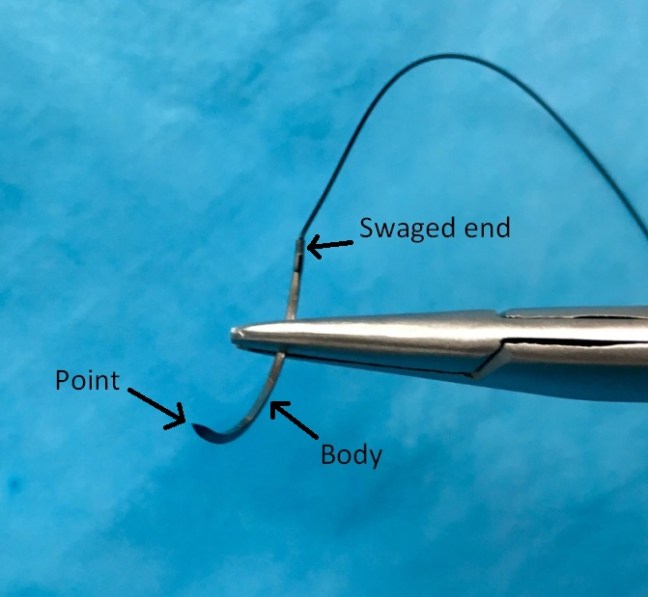
Suture/Needle Handling
- Load the needle on the needle driver 2/3 of the way from the point, towards the swaged end.
- This positioning allows the following steps to be achieved most easily.
Skin Entry
- Always enter with the needle perpendicular to the wound.
- Paradoxically, as you enter the skin, angle down and slightly away from the margins of the laceration. An incorrect tendency is to aim in the direction of the wound margin, which ends up causing a shallow suture placement that can (undesirably) invert the wound edges.
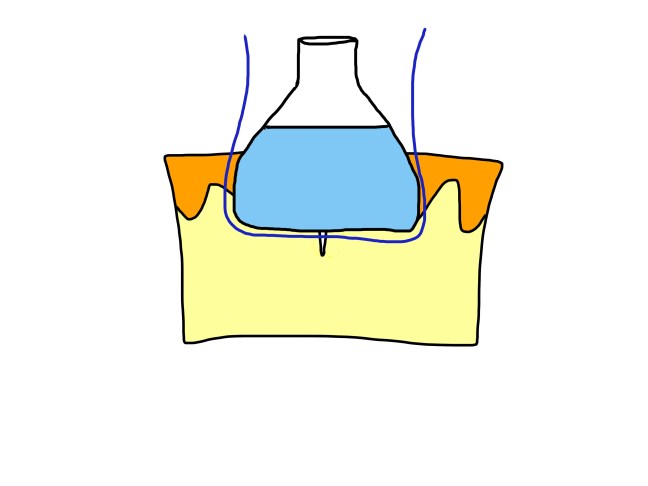
Follow through
- The needle is your friend–remember, it is designed by smart people for this application–simply follow its curvature through the underlying dermis.
- You will have created a “flask” shape which will ultimately create the eversion effect. Many incorrectly envision a circular shape for the suture, which will fail to evert the tissue.
- This is most important when there is a good amount of dermis below the wound, and may not apply for thinner areas of skin, such as the pre-tibial region.
The Finish
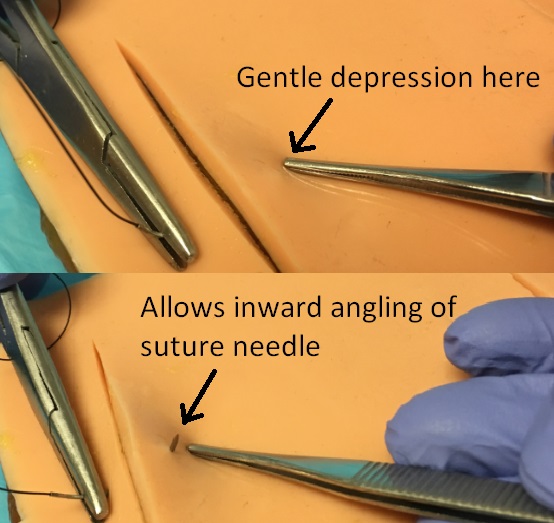
- Exit the skin with the needle perpendicular, similar to the entry.
- Exit equidistant on the far side of the wound, and attempt to angle the needle just slightly inwards to mirror the outwards angle on the entry side. This can be achieved by using a blunt instrument (such as closed forceps, or the flat side of suture scissors) to gently, slightly depress the tissue on the far margin outside of the wound as the needle exits the skin.
Knot Tying
- When performing an instrument tie, tie remotely from the wound with plenty of slack on the intervening suture thread. This prevents the “pulling up” effect which ultimately loosens the ties and leads to floating knots. See simple interrupted errors for more on this.
- Pull the knot to the side of the wound with better perfusion. This prevents the knot from granulating in to the wound as it heals, which can lead to more trauma and tissue destruction during suture removal.
No matter how far along we are in our practice, I think we should always strive for the perfect suture. If you are looking for some inspiration from another vocation, learn here about how Len Berk continues to strive at age 85 for the perfect slice of lox.
