
Now that it’s July and our new interns & sub-interns have arrived, and we graduate our junior residents from the level of learner to teacher, I thought it would be worthwhile to share a few common suturing errors that I’ve observed over years of giving basic suturing workshops to trainees. As a new experiment in engagement, I’ve laced this with a few tiktok videos, since many of these errors are microskills amenable to the 15 second format…
This is Part II of a two-part, top ten list. See Part I here or just pick it up from #6:
6. Tying too close to the wound.
New learners will often work within a very tiny perimeter of the wound. While this in itself is not technically “wrong,” it is unnecessary–and often results in tendency to pull upwards on the knot they are creating, which will effectively loosen it.
You might demonstrate that the same loop can be created along different lengths of the suture–often in a more ergonomic and economic manner.
7. Leaving tail end too long/Grasping tail end midway through suture
A new learner will often only pull a suture about halfway through a wound, such that equal lengths of suture exist on either side of the wound as they begin to tie. Intuitively, it makes sense—like equal length shoelaces or ribbon on a present—but the net effects are (1) wasted suture, after it is cut, (2) a strong likelihood they will grasp the distal end of the suture at its midpoint, such that tying it will result in creating a loop that needs to be coaxed out.
8. Placing sutures too close together
New learners don’t often have a good sense of how far apart to space simple interrupted sutures. Philisophically speaking, the correct spacing is the maximimum distance that allows good wound edge apposition and minimized tension on the wound. That is a little abstract for most beginners, so practically speaking, I’d invoke the “box rule.”
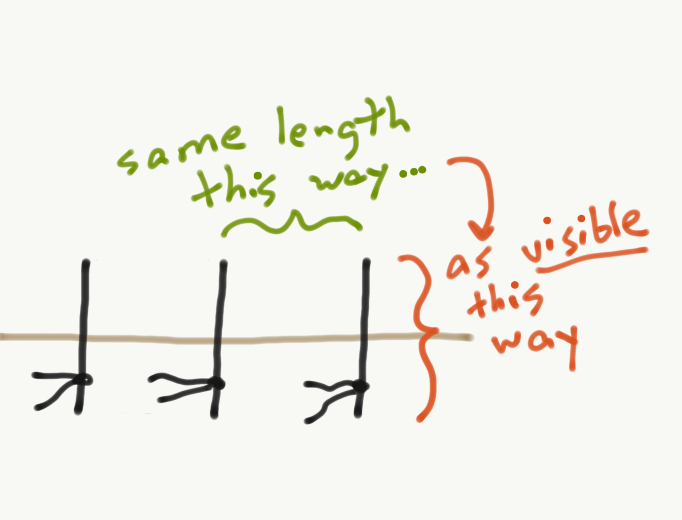
The correct spacing between sutures is approximately the same length as the visible suture that crosses the wound. As you walk the room, evaluate how each learner did on spacing the sutures.
9. Over-zealous tying
Instruct the learner that generally, the number of sutures should correspond with the suture size For example, 5 ties for a 5-0 suture, 6 ties for a 6-0 suture, etc. A new learner sometimes gets excited and continues to tie beyond this, wasting suture material and time.
10. Cutting tails too short.
The best learner perspective I ever saw on this was from a tweet:
Many students arrive traumatized from surgery rotations about how to do this right. Assuage these fears and let them know that the point is to leave a suture length that is easy to find and grasp for removal later, but not too long that it could get tangled or accidentally tied in to the adjacent suture while it is being placed.
That length is about 3-5 mm. Consider slightly longer over facial hair bearing areas, where it might become harder to identify a few days down the line.
BONUS TIP:
Foiled by suture “memory”
Many sutures, especially the expired ones we often leave for use in workshops, will retain the “memory” of the packaging. In other words, they will crease back and forth once extracted from the packaging. This makes them extremely difficult to work with!
A fun tip you can teach your learners from the start of the workshop is to pinch the length of the suture with two hands a few centimeters from the needle swage and run the fingers of one hand towards the free end of the suture. This will effectively erase that suture memory, and make everything that follows easier!
Thanks for reading! Any other errors you’ve commonly spotted and corrected in your new learners? Add your thoughts in the comments!
