
Here is an interesting case of a great laceration I recently saw. For medical students, a basic principle of wound evaluation and a neat trick in evaluating this particular wound is discussed. This case is posted with consent of the patient.
A 25-year-old healthy female who works as a stage actress was dressing in front of a heavy mirror. The mirror fell and shattered, slicing her across the back of her right ankle. She fell to the ground and was unable to stand. She arrived to the ED by ambulance with this laceration:

CLINICAL QUESTION:
Based on the location of the laceration and its depth, what would be your immediate concern? And, how would you test for it?
ANSWER:
If your answer was Achilles tendon injury, you are on the mark! As a general rule, with any deep laceration, take a moment to recall the underlying nervous, vascular, and tendon structures. Consult an anatomy text book if needed. In doing so, your exploration of the wound will be of higher accuracy and yield. Another great example of this is described in my post on principles of vascular injury.
My attempts at testing this patient’s active plantar flexion–the movement this tendon allows–were foiled by a high level of patient apprehension and pain. Even after the administration of local anesthetic to the wound, she just couldn’t give a strong effort.
This particular tendon is unique in that there is an option for indirect passive testing of tendon function. Although we more often think about the Thompson’s test* for patients with closed Achilles tendon injuries, it worked great in this situation to confirm my suspicion:
The wound was thoroughly irrigated. A careful exploration revealed a complete, transverse laceration to the Achilles tendon, as suspected! A referral was made to orthopedic surgery for a discussion of delayed repair. In the meantime, I closed the large skin wound by first aligning the tissues using three 4-0 nylon simple interrupted sutures, then by using a 4-0 nylon suture in running locked percutaneous fashion to completely align the wound. (This is my method of choice for long curvilinear wounds on the extremities–it’s a huge timesaver!)
As I repaired the wound, I learned that some of my staff weren’t familiar with how the calcaneal tendon earned its more common pseudonym. For trivia buffs: Achilles was a great warrior in Homer’s Iliad. The legend says his mother dipped him in the River Styx as a baby, holding him by the heel and thus making his body impervious to wounds everywhere except over that heel, which was not immersed in the water. In the Trojan War, he was shot by an arrow in the heel and mortally wounded. Since he died from such a seemingly small injury, the term “Achilles heel” came to mean a person’s point of weakness. So there you have it. But I digress.
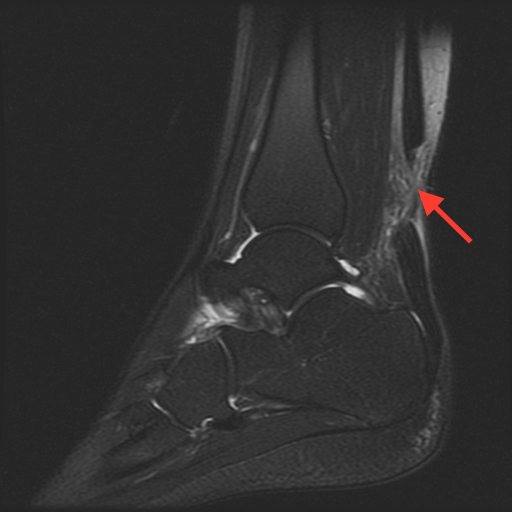
As an outpatient, the patient went on to have an MRI which confirmed the Achilles tendon was completely severed. The patient went on to have an operative repair of the tendon one week later, with a good prognosis for a normal functional outcome.
[*Purists will probably note that the most commonly described Thompson’s test would have the the patient prone with both knees extended and the ankles hanging off the end of the stretcher. I am more accustomed to performing it as noted in the video, with the patient prone and the knee flexed at 90 degrees. I have had excellent success using this method. While I don’t think flexion or extension of the knee makes much of a difference, I do think proning the patient is critical. This places the foot passively in a dorsiflexed position. If the patient is seated or supine, gravity will often plantar flex the foot, which will interfere with interpretation of the test.]
